
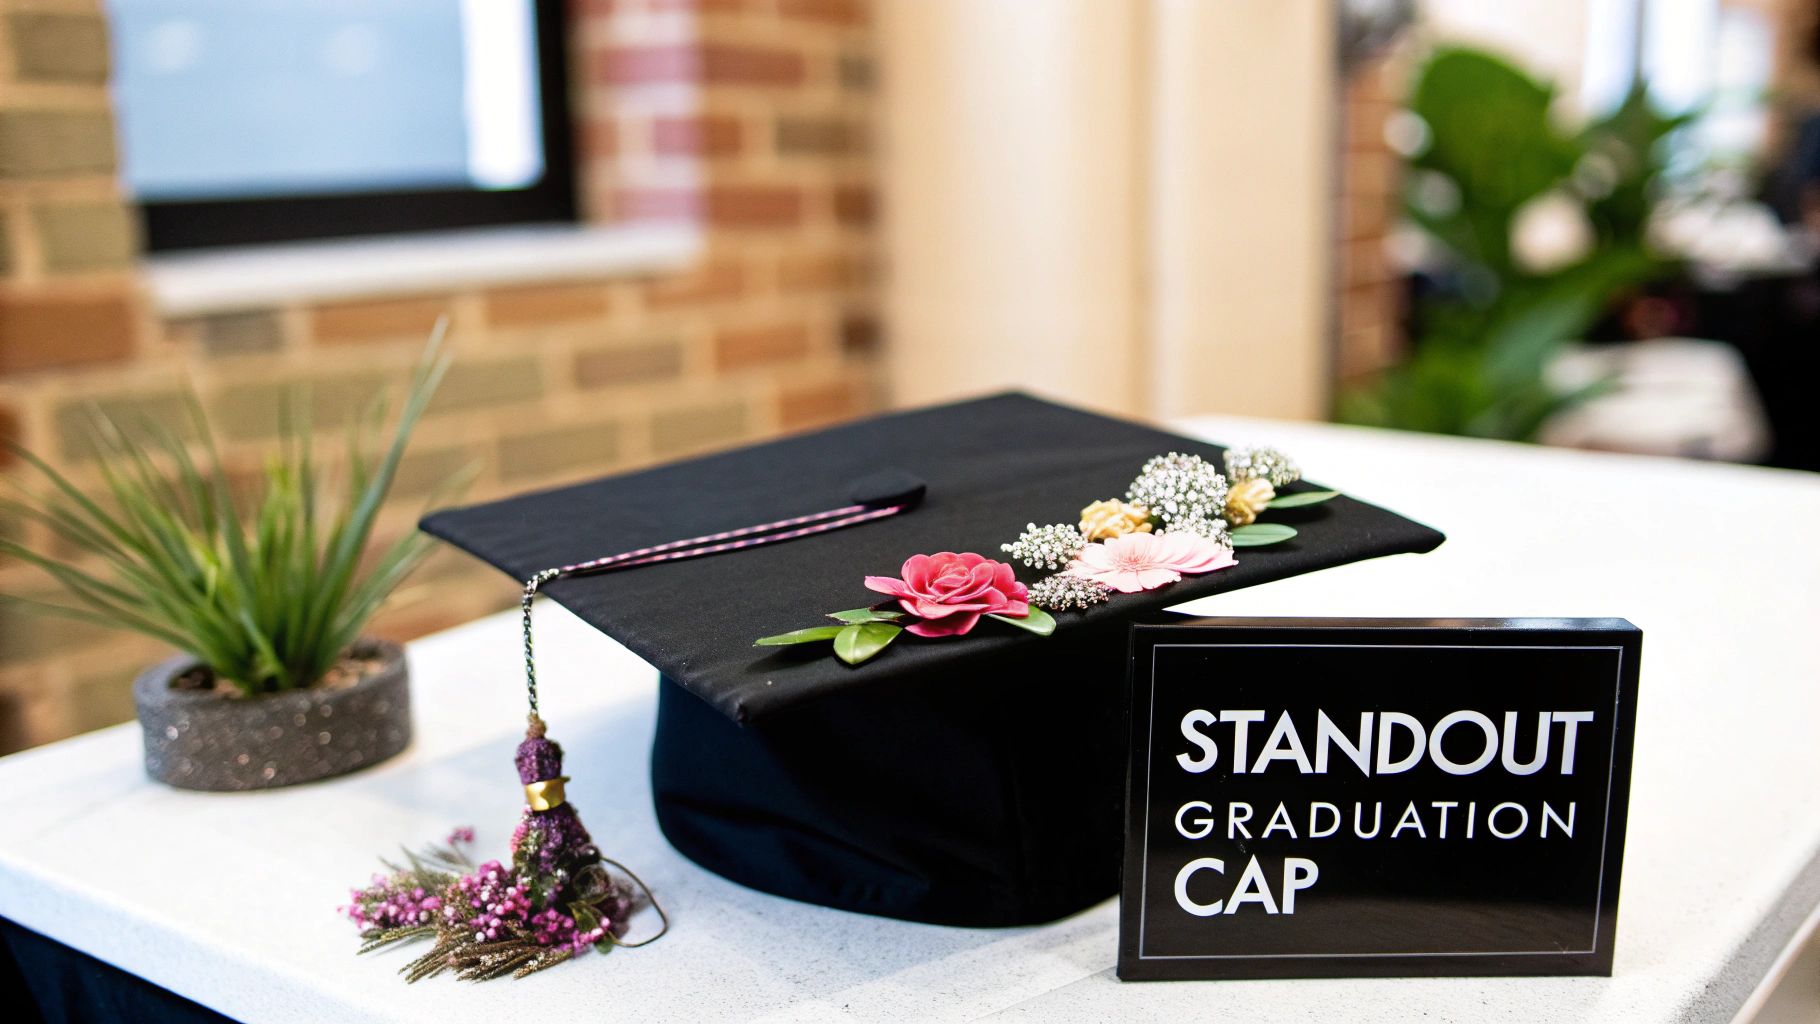
Decorating your graduation cap is your final chance to make a statement before you walk across that stage. It’s the perfect opportunity to thank your family, give a nod to your major, or share one last inside joke with your classmates. The best graduation cap decoration ideas run the gamut from elegant floral designs to hilarious pop culture references, letting you put your unique journey and personality on full display for the big day.
Your Guide to a Standout Graduation Cap
Decorating your grad cap is so much more than a fun craft project—it's become a modern tradition that lets you stand out in a sea of identical gowns. Think of it as your final creative mic drop before stepping into the next chapter. You're turning a simple piece of academic regalia into a canvas for self-expression, a way to commemorate years of hard work, late nights, and personal growth.
This tradition has become a meaningful and widespread part of commencement ceremonies everywhere, reflecting a larger trend in personalizing the graduation experience. It's big business, too. In 2024, families invested over $6.1 billion in graduation-related items, and a huge chunk of that went toward personal touches like cap decorations. This just goes to show how much graduates want to transform their mortarboards into vibrant displays of who they are. You can check out more insights on this from the National Retail Federation's findings.
Planning Your Perfect Cap Design
Before you break out the glitter and glue, a little planning goes a long way. Thinking through your theme, materials, and timeline will make sure your project is fun and stress-free, turning out exactly how you pictured it.
Graduation Cap Idea Snapshot
To get your gears turning, here's a quick look at some popular themes, what you'll need, and how long you can expect the project to take.
| Theme Idea | Essential Materials | Estimated Time |
|---|---|---|
| Elegant Floral | Faux flowers, pearl beads, hot glue gun, craft glue | 2-3 hours |
| Major-Specific | Cardstock, paint pens, 3D embellishments, vinyl letters | 3-4 hours |
| Inspirational Quote | Glitter, adhesive letters, stencils, sealant spray | 1-2 hours |
| Funny Meme/Pop Culture | Printed images, mod podge, rhinestones, cardstock base | 2-3 hours |
This table should give you a solid starting point for brainstorming your own one-of-a-kind design.
The key to a great design is starting with a solid foundation. A high-quality, sturdy graduation cap provides the perfect canvas for your creativity, ensuring your masterpiece holds up through the whole ceremony and for years to come as a keepsake.
This guide is packed with actionable ideas to help you create a cap you’ll be proud to wear. Whether you're aiming for a laugh with a meme-inspired design or want to create an elegant floral tribute, we've got you covered. For more tips on putting your entire look together, check out our guide on how to decorate your cap and gown for a cohesive and memorable appearance. We'll walk you through everything from popular themes to the essential materials needed to bring your vision to life.
Assembling Your Creative Toolkit
Before you can bring that perfect graduation cap design to life, you’ve got to gather the right supplies. Having everything you need on hand from the start not only makes the whole process a lot more fun but also guarantees your design is tough enough to survive all the hugs and photos on commencement day. The right tools are truly the foundation of any memorable graduation cap decoration idea.
First things first, let's talk about what holds it all together: adhesives. While your standard craft glue might work for flat paper or a cardstock base, anything with a little weight to it is going to need something stronger. Hot glue is the go-to for quickly securing things like faux flowers, chunky rhinestones, or 3D letters because it bonds almost instantly. For a super-strong, permanent hold that’s less bulky than hot glue, a clear epoxy like E6000 is fantastic, but just be sure to give it plenty of time to dry.
Choosing Your Decorative Elements
Once you've got your adhesives figured out, it's time for the fun part—picking out the decorations. You can find inspiration almost anywhere, but the key is to choose materials that will last. You don’t want your masterpiece falling apart before you even get your diploma.
- Glitter and Rhinestones For that essential sparkle, go for non-shed glitter or glittery cardstock to keep the mess to a minimum. Flat-back rhinestones are a dream to work with and come in tons of sizes and colors, perfect for creating intricate patterns or just adding a bit of bling.
- Faux Flowers and Greenery Lightweight silk or foam flowers can add a gorgeous, three-dimensional pop. You can arrange them around the edges for a floral crown vibe or cluster them in the middle for a lush centerpiece.
- Paint and Pens If you're hand-lettering a favorite quote or drawing a design, acrylic paint pens are your best friend. They give you amazing control and vibrant color. For a touch of elegance, gold or silver leafing pens provide a metallic finish that really catches the light.
Quick tip: Once your design is finished, a light mist of clear sealant spray can be a lifesaver. It protects your work from the elements and helps lock down any loose glitter or small beads, making sure everything stays put through the whole ceremony.
Perfecting Your Lettering and Details
Crisp, clear lettering is often the star of a decorated cap. While paint pens give you that personal, hand-drawn feel, they do require a steady hand. If you're aiming for perfectly clean lines, adhesive vinyl letters or custom-cut vinyl decals are a fantastic alternative. For those really unique and personal touches, you might want to look into custom designed stickers that can add specific images or themes you can’t find anywhere else.
Don't forget the little things that can pull the whole look together. Complementing your cap with a custom tassel or year charm adds a polished, cohesive feel that shows real attention to detail. To see how these small additions can make a huge impact, check out our guide on unique tassel charms for your graduation day.
To make your shopping trip a breeze and ensure you have everything before you start, here's a simple checklist.
Your Essential Shopping Checklist
| Category | Must-Have Items | Optional Add-Ons |
|---|---|---|
| Base & Adhesives | Black Cardstock Topper, Hot Glue Gun & Sticks, Strong Craft Glue | Double-Sided Tape, Clear Sealant Spray |
| Decorative Items | Rhinestones, Faux Flowers, Non-Shed Glitter | Pearl Beads, Small Charms, Ribbon |
| Lettering Tools | Paint Pens (various colors), Adhesive Vinyl Letters | Stencils, Pencils for Sketching |
Getting these items ready ahead of time means you can just relax and focus on the creative part without any last-minute runs to the store, ensuring your cap is a perfect reflection of everything you've accomplished.
Bringing Your Cap Design to Life
With your tools and materials ready, it’s time for the fun part: turning that blank mortarboard into a piece of art that tells your story. This is where your theme really comes alive. Whether you’re aiming for a heartfelt tribute or a laugh-out-loud masterpiece, the execution is what makes a design truly unforgettable.
Personalizing your graduation gear is more than just a passing trend. Every spring, Google searches for 'graduation cap decorations' explode, spiking by as much as 300% year-over-year right around May—perfectly in sync with commencement season. Market overviews for 2025 show that DIY decorations, themed toppers, and inspirational quotes are absolutely dominating the scene.
Creating a Heartfelt 'Thank You' Cap
One of the most powerful designs you can create is a tribute to the people who got you here. A 'Thank You' cap is a beautiful way to honor family, friends, or a loved one who can't be there to celebrate with you. It turns your cap into a wearable dedication.
Start with a cardstock topper that fits your mortarboard; this gives you a clean, removable canvas to work on. The heart of this design is usually photos. Print small, high-quality pictures of your supporters and arrange them in a collage.
You can weave in phrases like "Thanks Mom & Dad" or "For You, Always" using elegant vinyl letters or paint pens. To finish the look, add delicate faux flowers or pearl beads around the border for a soft, classy touch.
A great tip for photo-heavy designs is to use Mod Podge with a matte finish. It acts as both a glue and a sealant, protecting the photos and giving the entire surface a uniform, non-glare look that’s perfect for pictures.
Showcasing Your Academic Passion
You spent years focused on your major, so why not put it on display? This is your chance to get creative and show off that hard-earned expertise. These designs often blend technical details with artistic flair, making them really stand out in a crowd.
- For Nursing and Medical Grads: A 3D stethoscope draped across the cap is a classic. You can use a toy one or craft it yourself from wire and tubing. Add an EKG line made from glitter glue or a thin silver ribbon for a pop of energy.
- For Engineering and CS Majors: Use metallic paint pens or thin copper tape to create a circuit board pattern. For a cool 3D effect that catches the eye, you can even add a few non-functional LEDs.
- For Art and Design Students: A Pantone-inspired cap is a sleek and clever nod to your field. Just feature your favorite color swatch with the declaration, "Officially the Color of Success."
Once you have an idea, getting it onto your cap is the next big step. Knowing how to transfer designs onto fabric is a game-changer for achieving a clean, professional look, especially if you're hand-painting or embroidering.
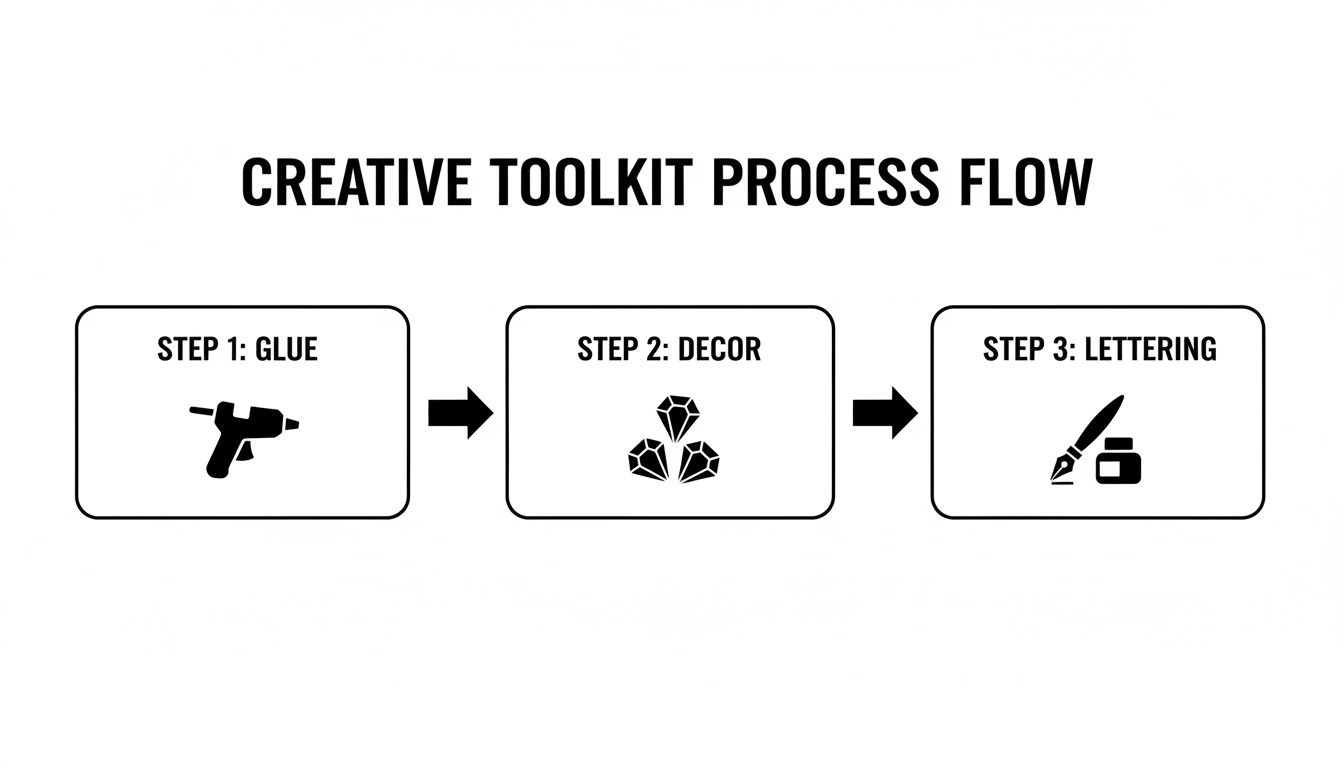
This simple flow breaks it down: every great cap design comes down to securing your base, adding your main decorations, and finishing it off with lettering.
Embracing Pop Culture and Humor
After years of intense study, sometimes the best way to celebrate is with a good laugh. Funny graduation caps are hugely popular, often featuring memes, TV show references, or witty one-liners that everyone can relate to.
A fantastic example is a Friends-themed cap with the iconic phrase, "Could I BE Any More Graduated?!" written in the show's font. For students who really felt the grind, a SpongeBob cap with the "4 ½ Years Later..." time card is a hilariously perfect choice.
Bringing these ideas to life is surprisingly simple—just use printed images sealed with Mod Podge and surrounded by glitter or rhinestones for extra flair.
Pairing Your Cap with a Cohesive Look
Your decorated cap is the star of the show, but it shouldn't stand alone. To really elevate your graduation day look, coordinate your cap with the other personalized elements of your regalia. This attention to detail transforms your outfit from simply decorated to thoughtfully styled.
Imagine pairing a floral-themed cap with a custom First Generation honor cord, weaving in similar colors to tie the two pieces together. Or, make a powerful statement by matching the vibrant patterns on a custom Kente stole with bold, geometric designs on your cap.
This kind of synergy creates a visually stunning and deeply meaningful ensemble. Of course, a polished look also means knowing the details. You might want to check out our guide on how to properly place the tassel on your graduation cap: https://www.graduationcapandgown.com/blogs/news/how-to-put-tassel-on-graduation-cap.
When you thoughtfully plan your cap and coordinate it with your graduation stoles and cords, you’re creating a complete, personalized story. You’re not just celebrating a degree; you’re celebrating your entire journey—your heritage, your struggles, and your unique identity—for everyone to see as you proudly walk across that stage.
Navigating School Rules and Color Palettes
A killer cap design is one thing, but making it perfectly match your official regalia? That’s next-level. When your decorations create a cohesive look with your school's graduation gown, hood, and tassel, it elevates your entire graduation day style. But before you get lost in glitter and glue, the first and most important step is to understand your school’s rules for commencement.
Trust me, the last thing you want is for security to confiscate your masterpiece at the door. Most schools have specific guidelines to keep the ceremony feeling respectful and special for everyone. These rules aren't there to kill your creativity; they're just to make sure the event runs smoothly and safely.
Understanding the Decoration Do's and Don'ts
Think of this as your final homework assignment. Before you even think about your design, you have to get familiar with what’s allowed. Most universities share a similar set of core rules.
Generally, schools want to avoid anything that could be distracting or disruptive. That usually means no:
- Obstructing Views: Anything that sticks up too high is almost always a no-go. Tall 3D objects or pop-up elements can block the view of the person sitting behind you, so keep your design flat.
- Lights and Sounds: Flashing LEDs, music, or any other electronics are a hard pass. The focus needs to stay on the ceremony, not a light show on your head.
- Offensive Content: This one’s a given. Any language, symbols, or imagery that could be seen as offensive, inappropriate, or discriminatory is strictly forbidden. Keep it positive and celebratory.
Adhering to these rules doesn't mean your cap has to be boring. The most memorable graduation cap decoration ideas often find a brilliant balance between personal expression and respect for the occasion.
Before you buy a single rhinestone, hit your school’s website or check the info packet they sent to graduating students. If the rules are a little vague, don't guess—just call the registrar's office or student affairs. It’s always better to ask first.
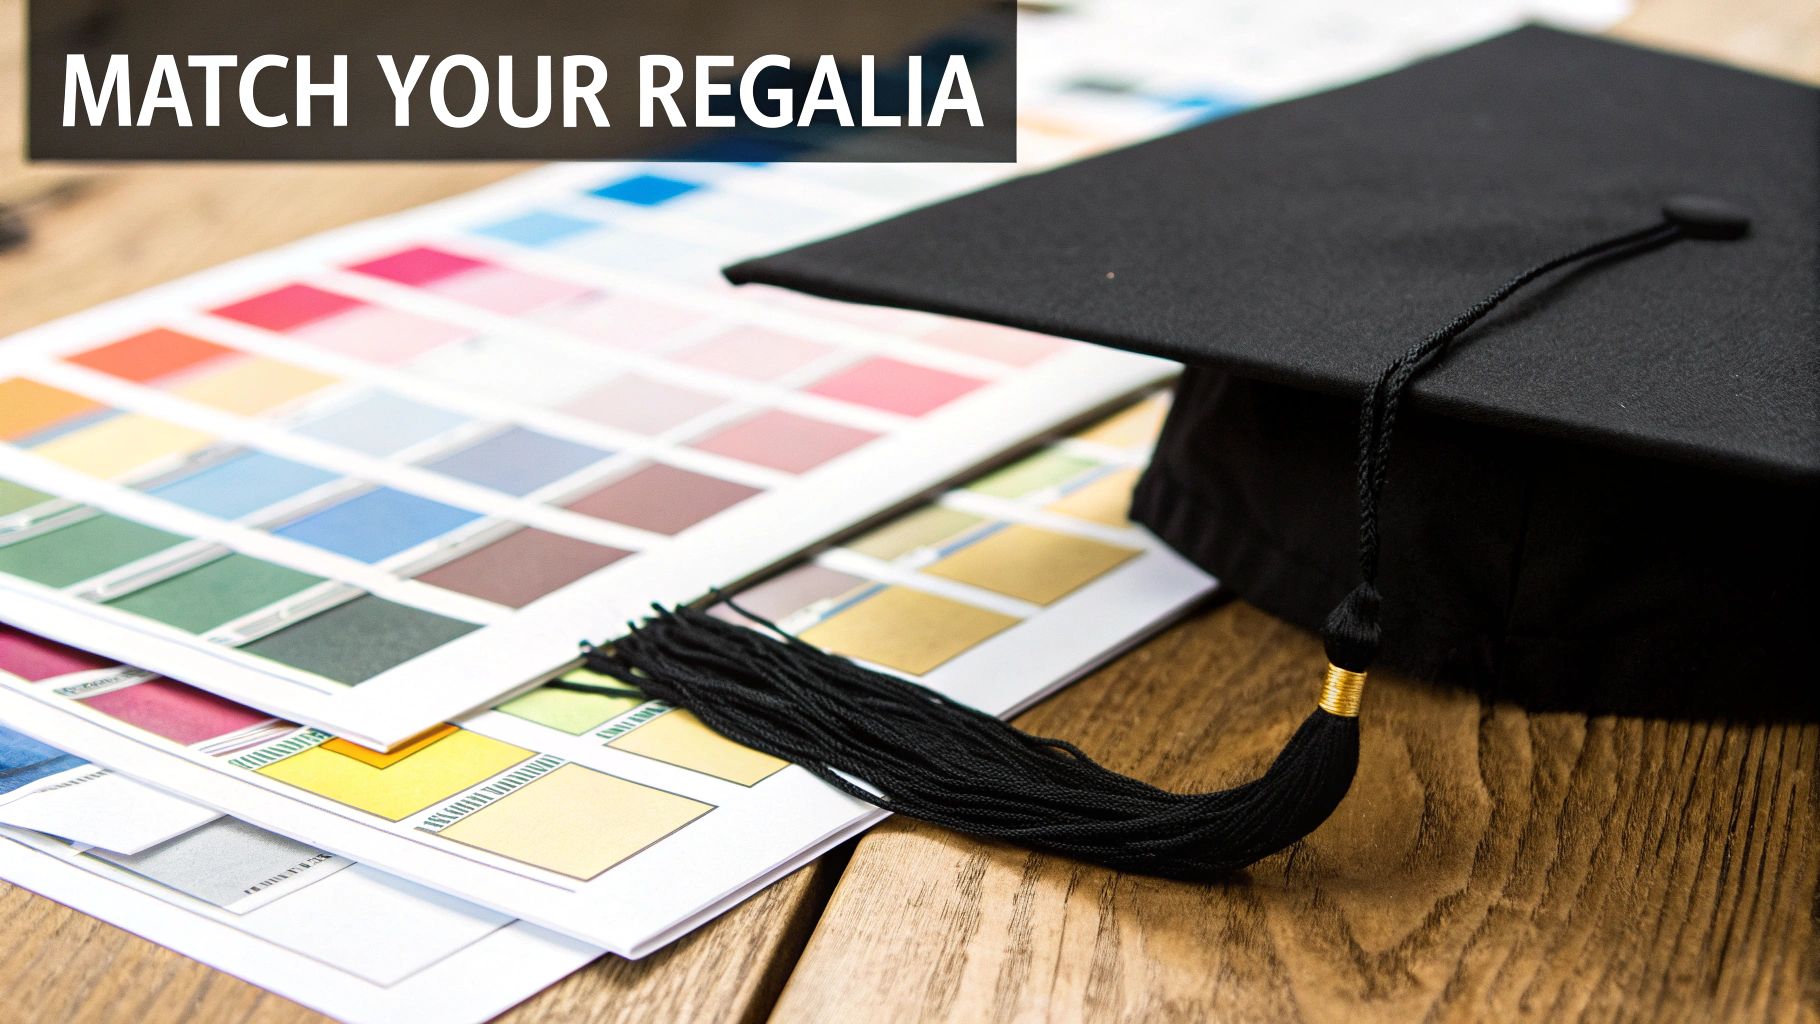
Mastering Your School Color Palette
Okay, once you’re clear on the rules, it’s time for the fun part: making your cap look amazing. The key to a polished, intentional design is working with your school’s official colors, not against them.
Using your school colors as the foundation is always a smart move. If your school’s colors are navy and gold, for example, you could use a navy cardstock base and add accents with gold glitter, paint pens, or metallic charms. It just works.
This ensures the shades in your design don’t clash with your gown. To get a better handle on the symbolism behind your regalia, it’s worth learning more about what different graduation tassel colors mean and how they tie into your specific field of study.
Color Matching Strategies for a Cohesive Look
Nailing the perfect color match can feel tricky, but a few simple strategies make all the difference. When you go shopping for materials, bring a photo of your regalia on your phone, or even better, a physical color swatch if you can get one.
Here are a few ways to approach your color scheme:
- Complementary Colors: Dust off your knowledge of the color wheel. If your gown is blue, a few strategic pops of orange or gold will create a dynamic contrast that really stands out.
- Monochromatic Scheme: This is a sophisticated and foolproof option. If you have a maroon gown, play with different shades and tints of that color—light pinks, deep reds, and rich burgundies all work together beautifully.
- Neutral Accents: When in doubt, neutrals are your best friend. Black, white, silver, and gold play well with just about any color and add a touch of elegance without being overwhelming.
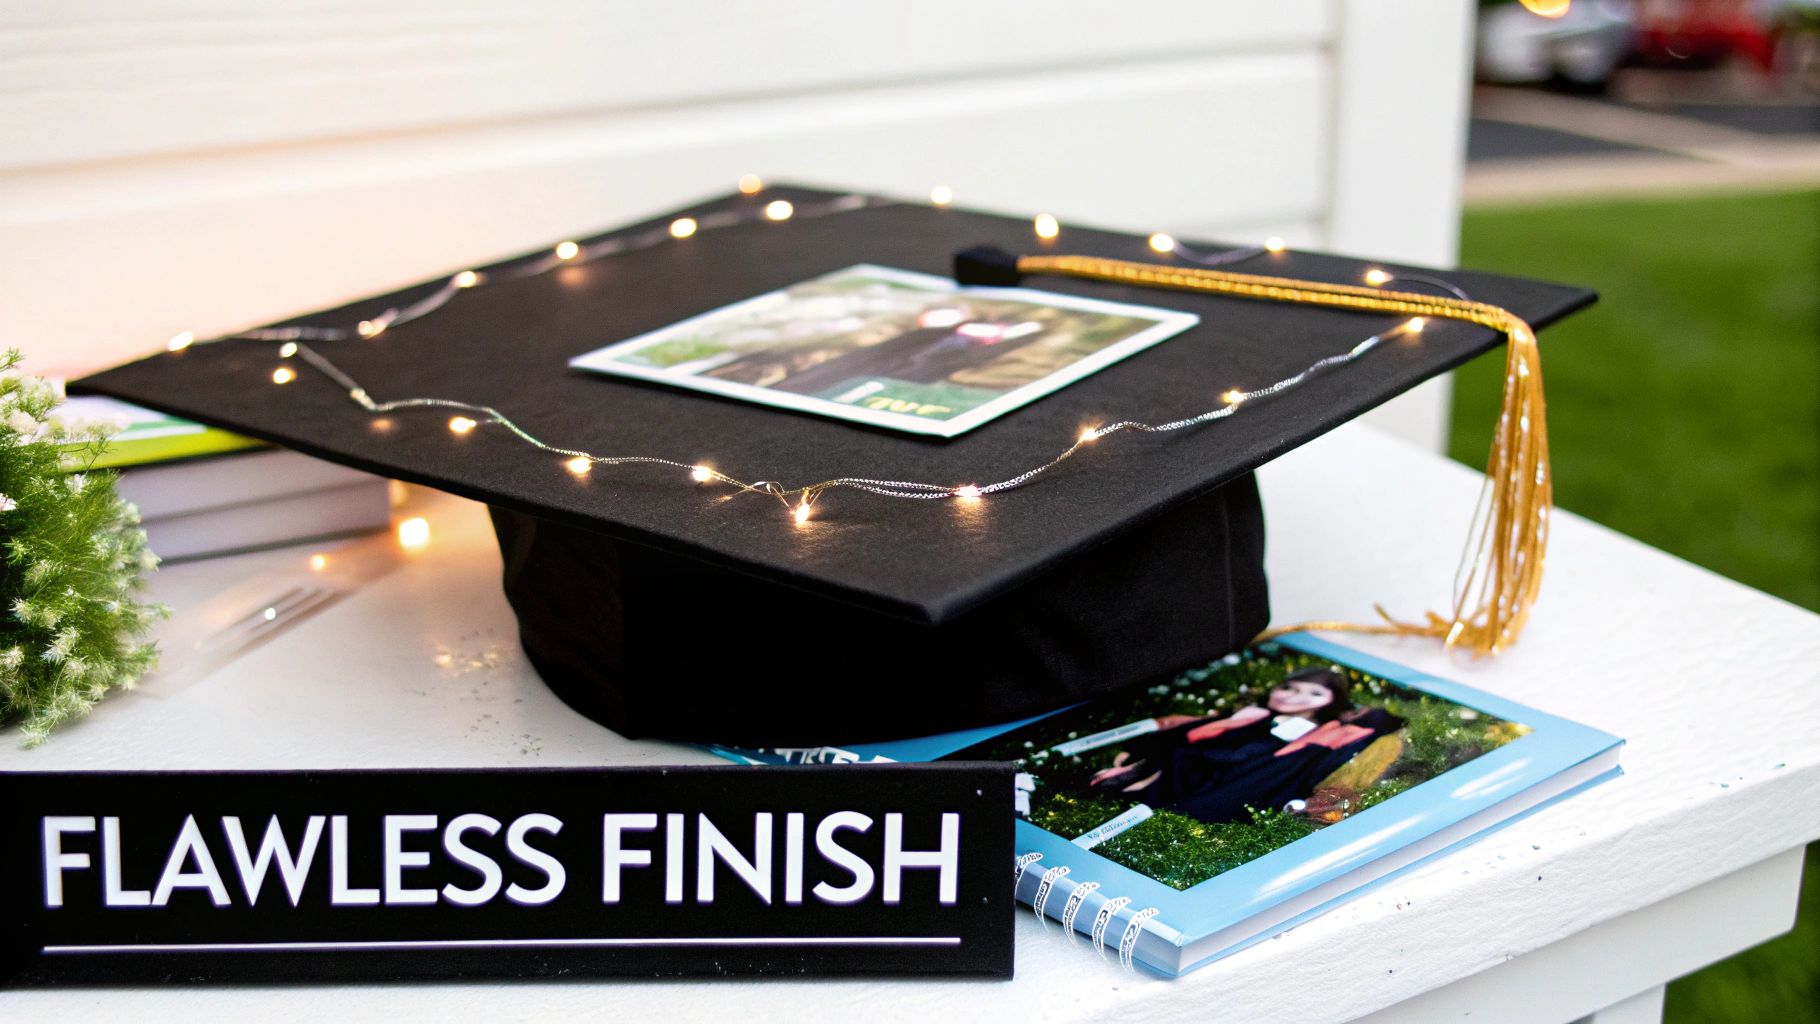
Advanced Tips for a Flawless Finish
Once you have the basic design down, it’s time to take your cap from a fun craft project to a genuine work of art. These are the techniques that add polish and dimension, turning your cap into something truly unforgettable. Moving beyond flat designs and simple lettering is how you create a keepsake you’ll be proud to display for years.
This is where you get to play with more complex textures, lighting, and finishes that bring your creative graduation cap decoration ideas to a whole new level.
Introducing Dimension and Light
One of the easiest ways to make your cap pop is to incorporate 3D elements. Instead of gluing flowers flat against the surface, try layering them at different heights with foam adhesive dots. This simple trick instantly adds depth and creates a much more dynamic look.
You can also craft cool pop-up elements using layered cardstock. A nursing grad, for example, could create a 3D heart monitor line that rises just slightly off the cap, or an art major might build a multi-layered paper sculpture. The key is to build your design in stages, starting with the base and adding smaller, more detailed pieces on top.
For a little bit of magic, consider weaving in some subtle LED fairy lights. You can find tiny, battery-powered micro-LED strings that are lightweight and incredibly easy to work with.
- How to Add Lights: Carefully weave the thin wire through your design, securing it with tiny dabs of hot glue on the underside of your flowers or letters.
- Battery Pack Placement: Use strong double-sided tape or a small fabric pouch to stick the battery pack discreetly to the underside of the mortarboard. Just make sure it doesn’t get in the way of how the cap sits on your head.
This creates a beautiful, soft glow that looks amazing in photos, especially during evening or indoor ceremonies. It’s a guaranteed head-turner.
Achieving a Professional-Grade Finish
The little details are what separate a good design from a great one. Getting those crisp, clean lines with paint pens, for instance, just takes a steady hand and a bit of practice. Always sketch your lettering lightly in pencil first, then trace over it slowly and deliberately.
If you mess up with a paint pen, don't panic. You can usually clean it up with a cotton swab dipped in a little rubbing alcohol while the paint is still wet.
Glitter is a graduation classic, but nobody wants it shedding all over their gown. The secret weapon here is a good spray sealant. Once your glitter is glued down and totally dry, give the entire cap a few light, even coats of a clear acrylic sealer. This locks every sparkle in place and gives your whole design a protective finish.
For caps that feature photos or delicate paper elements, a thin layer of resin can create a stunning, glass-like finish. It doesn’t just protect the images; it adds a glossy, professional sheen that looks incredible. Just be sure to work in a well-ventilated area and follow the product instructions carefully, as resin can be a bit tricky.
Troubleshooting Common Decoration Problems
Even the most carefully planned project can hit a snag. Knowing how to fix common issues can save your design and keep the stress levels down. Here’s a quick guide to solving some frequent decoration hiccups.
| Problem | Quick Fix | Pro Tip for Prevention |
|---|---|---|
| Wrinkled Paper or Photos | Gently lift the wrinkled spot and use a small paintbrush to apply a thin, even layer of glue. Smooth it down from the center out. | Use a spray adhesive or Mod Podge instead of liquid glue. Apply pressure with a flat tool like a ruler to push out air bubbles. |
| Crooked Lettering | If you're using vinyl letters, carefully peel and readjust them before pressing down. For painted letters, it's often best to paint over and start again. | Use a ruler and light pencil guidelines to make sure your text is perfectly straight before you start painting or sticking. |
| Glitter Spills and Messes | A lint roller or some painter's tape is perfect for picking up stray glitter from your gown or workspace without smearing it. | Always work on a disposable surface like newspaper. Apply glitter over a tray to catch the excess for easy cleanup and reuse. |
Finally, after putting so much effort into your cap and gown, you'll want to protect the whole ensemble. Investing in a dedicated garment bag from Graduation Cap and Gown is a smart move. It keeps everything clean, wrinkle-free, and safe from any last-minute accidents before the big day.
Got Questions About Your Grad Cap? Let's Get Them Answered
Even with the perfect design in mind, a few practical questions always pop up once you get down to the business of actually making it. I’ve seen it all over the years. Here are the answers to the most common questions graduates have, so you can start your project feeling totally prepared.
How Can I Decorate My Cap Without Ruining It?
This is the number one concern, and for good reason! The secret is to not decorate the cap directly. Instead, you're going to create a removable topper.
Grab a piece of sturdy cardstock and cut it to the exact size of your mortarboard. Most caps are 9.5 x 9.5 inches, but it never hurts to measure yours just in case. This cardstock square is now your canvas. Go wild—paint it, glue things to it, cover it in photos. Once your masterpiece is complete, attach it to the cap with removable double-sided tape or some sticky dots in the corners.
This trick keeps the original cap in perfect condition for the school and lets you keep your custom design as a memento. Just don't forget to carefully cut a small hole in the middle of your topper so the tassel can pop through!
What's the Best Glue for Sticking 3D Stuff On?
When you’re working with heavier items like faux flowers, chunky rhinestones, or little figurines, your choice of glue is everything. You need something that can hold up through all the hugs, photos, and cheering.
For the most secure and fastest bond, a hot glue gun is your absolute best friend. It sets in seconds and creates a really strong hold that will survive the entire day.
Another great option is a heavy-duty industrial craft glue like E6000. This stuff is incredibly powerful and permanent. It does take a bit longer to fully cure—sometimes up to 24 hours—but it dries clear and won't let you down.
For lightweight, flat decorations like paper cutouts, photos, or glitter, a simple craft glue or a layer of Mod Podge will do the trick perfectly. The key is to match the strength of your adhesive to the weight of your decorations.
When Should I Actually Start This Project?
Trust me on this one: procrastination is the enemy of a great grad cap. To save yourself from a frantic, late-night crafting session, give yourself at least a full week before the ceremony. This is the sweet spot.
Here’s why that timeline works so well:
- Time for Supplies: It gives you a few days to browse the craft store and gather everything you need without feeling rushed.
- Creative Breathing Room: You’ll have plenty of time to sketch out your ideas, experiment a little, and get the design just right.
- Crucial Drying Time: This is a big one. You need a buffer for paints, glues, and any sealants to dry and cure completely.
- A Buffer for Mistakes: If something doesn't go as planned (and sometimes it doesn't!), you’ll have more than enough time to fix it without panicking.
Are There Any Decorations I Should Absolutely Avoid?
Yes, absolutely. While your cap is a canvas for your personality, you still need to be respectful of the ceremony and your school's rules. The first thing you should do is check your university's official graduation guidelines.
But as a general rule, you should steer clear of these things:
- Anything That Blocks the View: Tall 3D objects that might make it hard for the person sitting behind you to see are a common no-go.
- Distracting Elements: Things like flashing lights or anything that makes noise are usually banned because they can disrupt the ceremony.
- Offensive Content: This should go without saying, but any inappropriate language, symbols, or imagery will not be allowed.
When in doubt, a flat and tasteful design is always a safe (and beautiful) bet. The goal is to create a cap that gets admired, not one that gets confiscated at the door.
At Graduation Cap and Gown, we have everything you need to create a look as unique as your journey. From the perfect cap to honor cords and custom stoles, start building your unforgettable graduation day ensemble at https://www.graduationcapandgown.com.