

The ceremony is over, but the evidence of the day is still scattered across the house. The mortarboard is resting on a chair, the tassel is caught in a graduation photograph, the stole has been draped over a parent's shoulder, and the diploma is tucked inside a bag where it may already have picked up a crease. Within a few weeks, most of those pieces will either disappear into a closet or become part of a carefully planned shadow box display.
The difference is more than presentation. A graduation shadow box is a small preservation project. It needs suitable depth, archival backing, textile-safe attachments, controlled light, and a layout that lets each keepsake remain visible without being permanently altered. This guide covers the practical decisions that matter, from choosing a box for a cap and diploma to mounting doctoral regalia and caring for the finished frame.
The Moment You Want to Bottle From the Ceremony
A graduation day moves too quickly for anyone to protect every object perfectly. A graduate holds the cap at arm's length for photographs, the tassel swings across the mortarboard, and the stole shifts out of place between the auditorium and the family portrait. Someone rolls the diploma into a bag for convenience, while medals, honor cords, and programs collect in pockets.
The natural response is to put everything away until there's time to sort it. That time often arrives much later, after fabric has been compressed, tassels have tangled, and metal pieces have been exposed to ordinary air and handling. A closet may protect a cap from immediate damage, but it doesn't provide the organized, buffered environment that a proper display case can provide.
The ceremony itself follows a formal sequence, and that sequence can help you decide which objects belong in the final display. The graduation ceremony order of events can also help families identify the regalia and recognition pieces that carried meaning during the day.
Treat the display as a small archive
A well-planned shadow box display separates preservation from decoration. The backing should be acid-free and pH-neutral, the frame should provide enough room for dimensional items, and the attachments should be removable. The glazing should keep the object from touching the front surface, while light exposure should be controlled, particularly for colored satin, printed programs, and diploma paper.
Archival framing guidance recommends deep frames with a stable air gap between the object and glazing. One framing source describes internal depths from about 1/2 inch to 10 inches or more, with side walls lined in conservation mat board to create a buffered enclosure, and recommends limiting light to 50 lux for light-sensitive materials. For highly sensitive objects, the same guidance gives a target of only 25 days per year at 50 lux. Conservation framing guidance for shadow box displays explains why depth and light management belong in the planning stage, not after the keepsakes have been attached.
What tends to fail
The shortcuts are familiar. Hot glue is fast, ordinary double-sided tape looks tidy, and pins can seem harmless when the item is inexpensive. Graduation regalia is rarely inexpensive in sentimental value, however, and many textiles show damage only after an attachment has been left under tension or heat for a long period.
Avoid building the display around permanent adhesives. Use reversible supports, archival hinges, fine monofilament, or custom mounts instead. Keep metal medallions from pressing directly against colored fabric, and don't force a folded stole into a shallow frame just because the outside dimensions look suitable.
Workshop rule: If you can't remove the item without leaving a mark, the mount is solving the display problem at the expense of the keepsake.
Before ordering anything, gather the cap, tassel, stole, cords, medals, diploma, hood, program, and any accessory you want to preserve. The finished display should tell the story of the achievement without becoming so crowded that individual pieces disappear. A well-built shadow box display is the difference between keepsakes that survive one move and keepsakes that survive decades.
Picking the Right Shadow Box Size and Depth
Choose the frame from the assembled footprint of the regalia, not the diploma alone. Lay out the cap, tassel, stole, cords, diploma, and any other keepsakes on a clean surface in roughly their intended positions. Measure the full width and height, then add breathing room around the edges. Allow for the frame's inner lip, mat, spacers, and mounting points. A layout that fits on paper can look cramped once those construction details take up space.
Retail shadow boxes commonly come in 5x7, 8x8, 8x10, 9x9, 11x14, 12x12, 16x16, 16x20, 18x24, 20x20, and 24x36 inches. The most common retail sizes identified in This shadow box size guide are 8x8, 11x14, and 16x20. Those formats work for many projects, but graduation regalia often needs a custom proportion. A cap, long stole, or wide hood uses space differently from a flat photograph.
Depth decides whether the plan works
The outside dimensions show whether the composition fits the wall. Interior depth determines whether the keepsakes can sit without compression. A cap creates pronounced relief, a folded stole takes more room than its fabric thickness suggests, and a mounted diploma may project forward from the backing.
For a project that includes a cap, plan for at least 2.5 inches of interior depth. Doctoral regalia with a hood generally calls for 4 inches or more, particularly when the hood remains folded instead of flattened. Do not use the frame's outside depth as your available cavity. The backing, mat board, spacer, and raised supports all reduce the room left for the objects.
| Keepsake Set | Box Size (inches) | Min. Depth (inches) | Best Use |
|---|---|---|---|
| Diploma, tassel, and small accessory | 11x14 | 1.5 | Compact wall display |
| Cap, tassel, and diploma | 16x20 | 2.5 | Bachelor's keepsake set |
| Cap, stole, cords, and diploma | 16x20 or 18x24 | 2.5 | Larger bachelor's arrangement |
| Cap, hood, stole, and diploma | 18x24 | 3 | Master's regalia |
| Tam, hood, robe panel, medals, and diploma | 20x24 or 24x30 | 4 or more | Doctoral regalia |
Treat these dimensions as planning formats, not substitutes for measuring the actual garments. The guide's retail range runs from 5x7 through 24x36, while a graduation project may need an unusual proportion for a long stole or broad hood.
Compare the frame construction
A wood shadow box gives the display a traditional appearance and can coordinate with a diploma frame. For ideas about coordinating wood construction, see this wood diploma frame guide. A deep-set frame with spacers creates a more controlled air gap and suits a formal mat opening. An acrylic-front museum-style case can weigh less than glass, though its surface may attract static and requires careful cleaning.
Specify acid-free backing board, rag matting where appropriate, and UV-filtering glazing. These materials reduce risks to colored textiles and printed documents during long-term display. UV-protective or museum-quality glazing also helps control fading and reflection. This framing resource on UV-protective shadow box glazing provides useful context for choosing the front panel rather than treating glazing as a minor finishing detail.
Use a measurement worksheet
Record the following before ordering:
- Overall footprint: Measure every item in its intended display position, including the proposed width and height.
- Highest relief: Measure from the backing surface to the highest point of the cap, hood, medal, or raised diploma mount.
- Removal clearance: Leave room to release pins, threads, or accessory supports later.
- Visual margins: Reserve clear space around the composition so the frame does not feel overloaded.
- Wall clearance: Include the hanging hardware and expected projection when checking the installation location.
A deeper box with a simpler arrangement is usually safer than a shallow box packed with decorative layers. The extra room lets the mounts support the regalia without forcing the cap, hood, or folded textiles flat. That clearance protects the graduation keepsakes as a preservation project, not merely as wall décor.
Mounting Caps, Tassels, Stoles, Cords, Medals, and Diplomas
Mounting graduation regalia requires different solutions for different materials. A cap is structured but vulnerable to crushing. A stole is flexible and may hold embroidery or metallic trim. A cord needs gentle restraint rather than a tight anchor, and a diploma needs support that doesn't puncture or stain the paper.
Start with a clean work surface and handle textiles with clean hands or suitable gloves. Photograph the layout before attaching anything, then test every mount while the backing is outside the frame. That makes it easier to inspect tension and prevents a hidden fastener from becoming impossible to reach.
Begin with the cap
Shape the mortarboard gently rather than forcing it into a sharp fold. Support the cap with archival foam saddles or pinned tulle strips beneath the structure. The support should hold the cap in position without creating a visible ridge through the crown.
Don't glue the cap crown. Adhesive can migrate into felt or fabric, stiffen the material, and leave a visible mark that can't be reversed cleanly. A removable support beneath the cap is less decorative than a glued attachment, but it protects the object and makes future removal possible.
The tassel belongs on the right at rest, with the drape arranged naturally rather than pulled tight. Secure the cord end with a tiny T-pin or an acid-free thread loop, then let the fringe hang freely. A dedicated tassel holder can keep the head and fringe separated, while a graduation keepsake accessory kit may simplify the combination of pins, supports, and small holders needed for a coordinated arrangement.
Fold the stole and hood along their structure
Fold the stole in thirds along its original drape lines. Don't press a new crease into embroidered or metallic sections merely to make the stole fit a smaller box. Mount it to a fabric-covered backer with stitched support strips, transparent stitching, or carefully positioned corner mounts. Staples and ordinary pins can cut fibers, catch embroidery, or create concentrated pressure points.
A hood needs its own support. If it's folded over a dowel, ensure the dowel is stable and doesn't press the lining against the glazing. The fold should remain visible, especially if the hood's velvet or trim identifies the degree level and school colors.
Give cords and medals room to move
Cords can be coiled loosely or arranged in gentle waves. Attach them with small clear archival hooks or brass pins anchored into the backer, never through the cord itself. The attachment should restrain movement while leaving the cord's surface undamaged.
Medals and honors should sit in recessed, non-abrasive holders. Separate metal from textiles with an inert spacer or pocket so tarnish products and pressure don't transfer directly to satin or felt. If a medal is heavy, use a secondary support rather than relying on one small pin.
Diplomas work best on a raised mat ledge or in a shallow sub-frame positioned slightly forward of the regalia. That arrangement creates a visual hierarchy while keeping the paper flat and supported. Use photo corners or another reversible paper-safe attachment instead of tape.
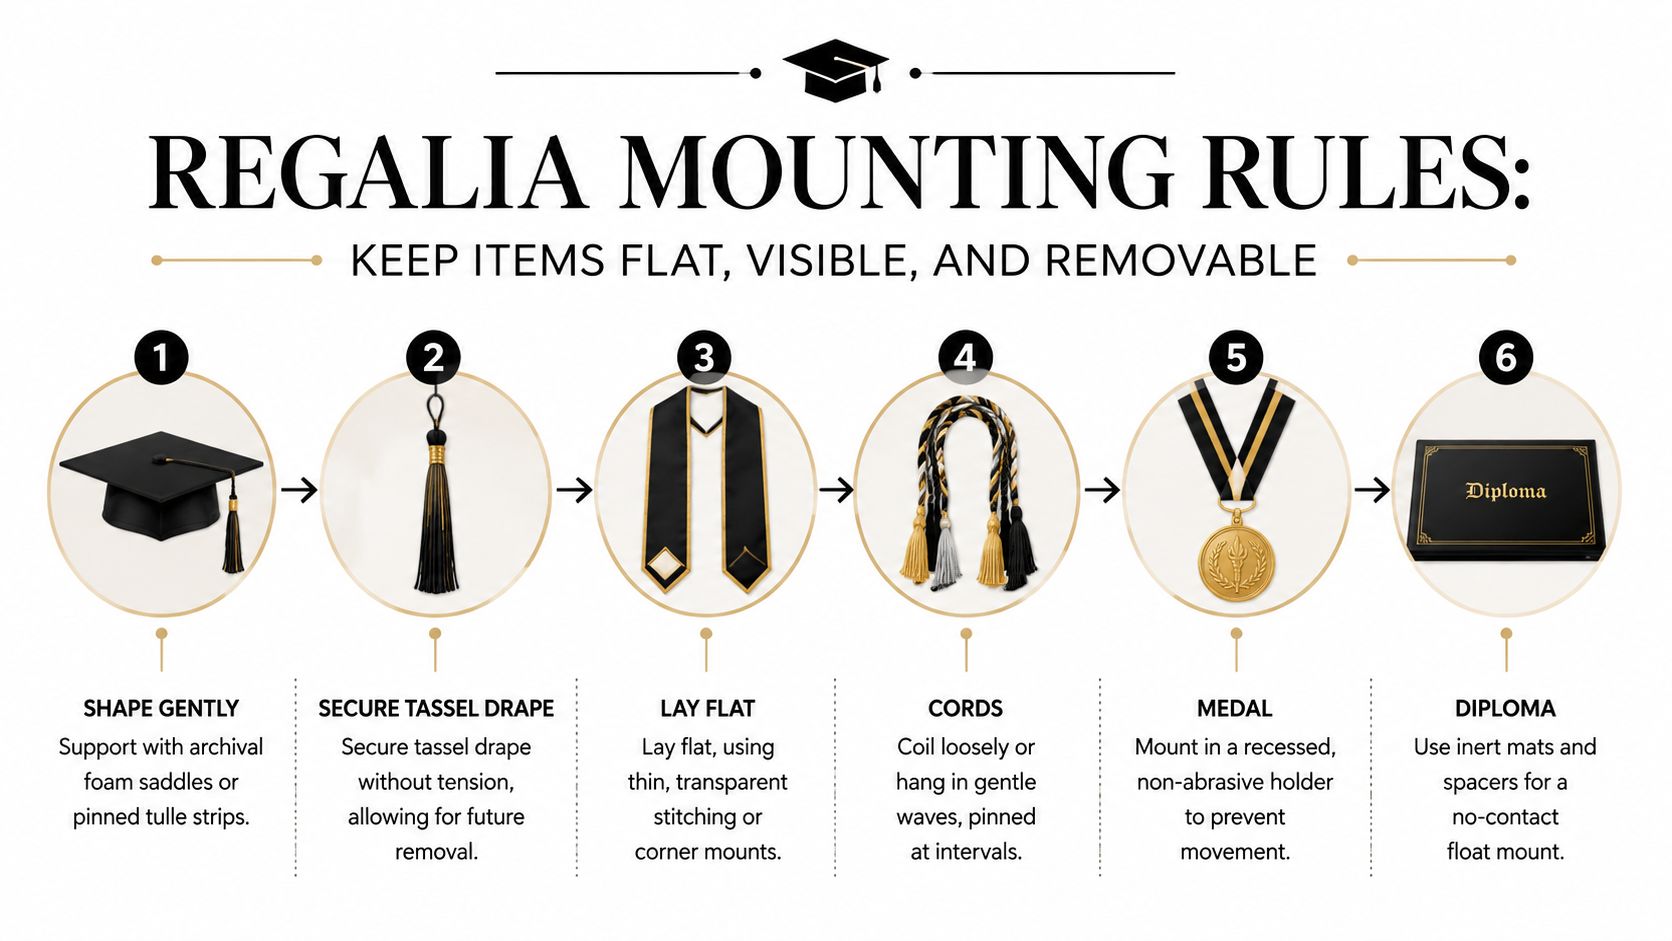
Mounting test: Every attachment should release without tearing, staining, stretching, or leaving a pressure mark on the item.
Small accessories can complete the story without competing with the degree pieces. A tassel charm, honor medallion, or school-color cord belongs where it can be seen and removed independently. For ideas about how a charm can relate to the tassel without adding visual clutter, see these graduation tassel charm options. The same principle applies to any keepsake accessory kit. Use it to organize the display, not to add hardware just because it is available.
Preservation Rules for Textiles and Mixed Materials
A graduation shadow box contains materials that age at different rates. Satin, felt, metallic trim, medals, diploma paper, and a printed program each need separate handling. Build the frame to keep incompatible materials apart, rather than sealing the whole arrangement into one contact surface.
The main risks are: fibers can yellow or fade, metals can tarnish, diploma ink fades under direct light, and unsuitable adhesive can bleed through cap felt. Trouble often starts where materials meet, such as a medal edge pressing into fabric or a sticky mount touching paper.
Match the board and tissue to the fiber
Use acid-free mat board with a pH above 8 when the conservation plan calls for buffered board. Wool and silk generally need unbuffered tissue, while buffered tissue suits cotton and polyester blends. Board and tissue selection should follow the fiber, not the price or appearance of the material. For broader guidance on handling a gown before framing, see this graduation gown keepsake guide.
UV-filtering acrylic is a practical alternative to glass when weight matters. It makes a large shadow box easier to handle and avoids glass breakage during a move. Clean the acrylic with care, and maintain enough frame depth to prevent it from touching the regalia.
Separate materials instead of sealing problems together
Place inert spacers between metal and fabric. Use recessed pockets or holders for medallions and charms, especially when their edges could rub against a stole. Diplomas should rest in photo corners or a floating mount that supports the sheet without adhesive crossing the printed surface.
Avoid rubber cement, hot glue, and ordinary double-sided tape. Pressure-sensitive archival tape may suit limited framing applications, but it cannot replace mechanical support. Once the frame is closed, adhesive is hard to inspect, and bleed-through may appear only after heat or light exposure.
Graduation pieces require decisions that generic memorabilia guidance may not address, especially satin, embroidery, metallic trim, and layered regalia. This guide to protecting graduation items in a shadow box offers a practical reference for those material-specific concerns.
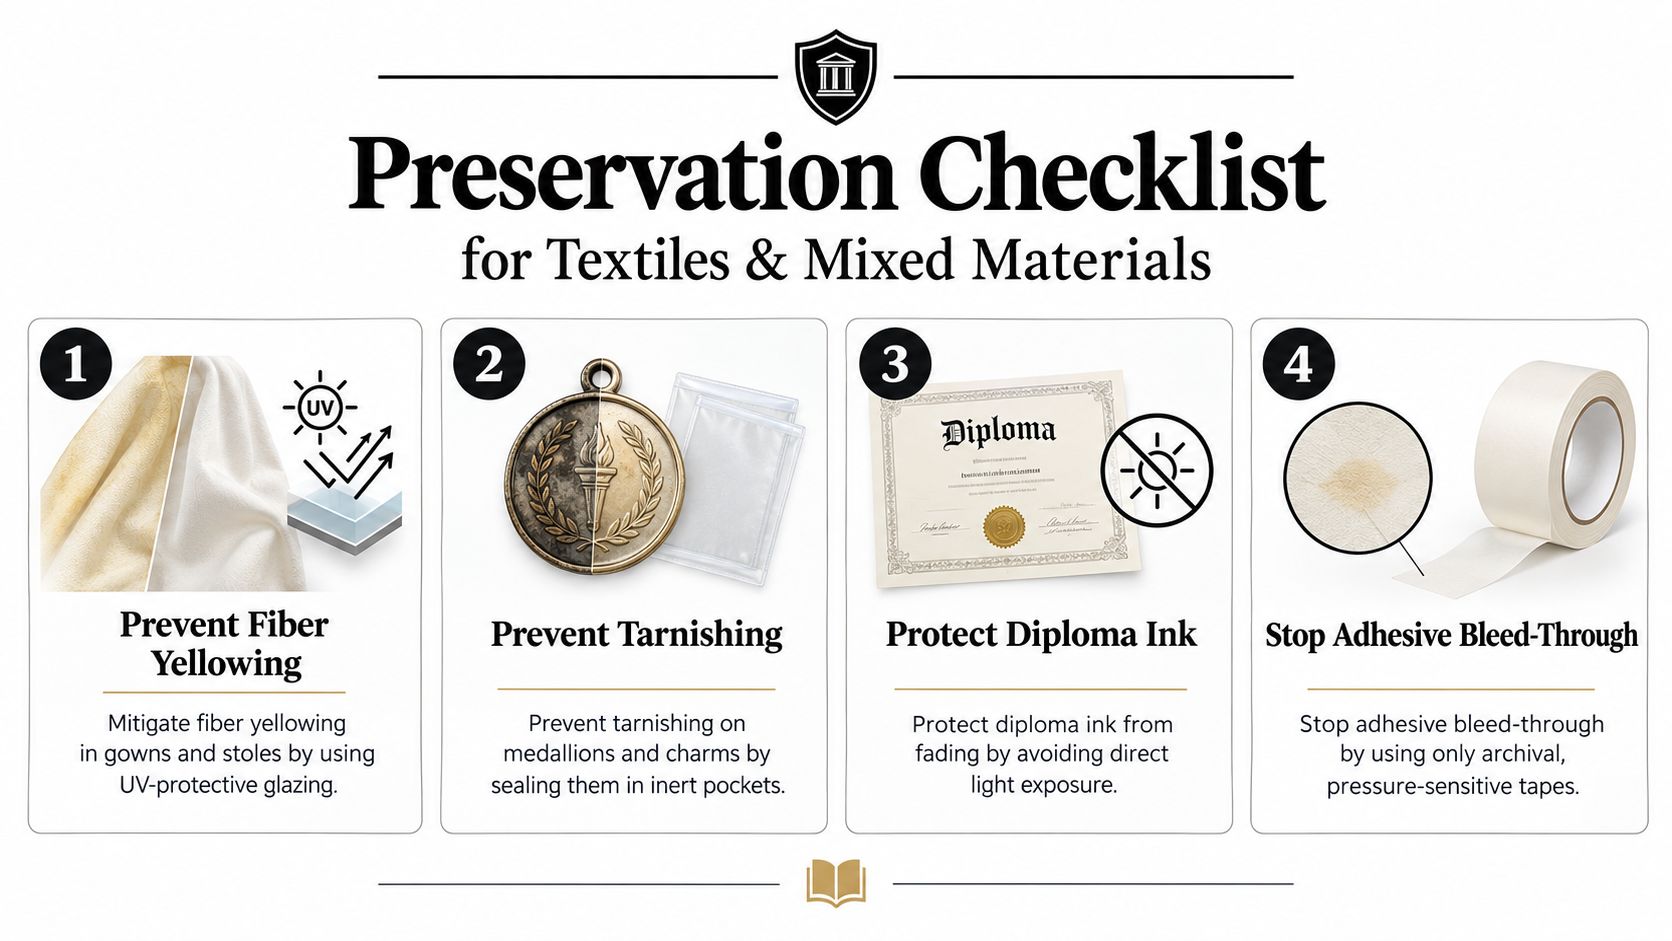
Run a simple material check
Before final assembly, inspect every component:
- Board: Confirm that the backing and mat are acid-free and suitable for the textile.
- Contact points: Check that no metal touches colored fabric or paper.
- Adhesives: Remove rubber cement, hot glue, and standard double-sided tape from the plan.
- Glazing: Choose UV-filtering acrylic or glass that leaves a stable air gap.
- Backing: Use a breathable, well-sealed rear closure that blocks dust without trapping obvious moisture.
Keep the box away from bathrooms, kitchens, and rooms with frequent humidity swings. Stable relative humidity matters as much as the visible materials. Even a careful mount can suffer when damp air and temperature changes repeatedly stress paper and textiles.
Layout Templates for Bachelor's, Master's, and Doctoral Regalia
A good layout gives the eye one clear place to begin. The degree level determines which item should lead, while school colors, embroidery, and personal recognition pieces provide supporting detail. Start with paper rectangles representing each object, tape them temporarily to a backing board, and view the arrangement from a normal standing distance.
Don't force every keepsake into the same arrangement. A bachelor's display often benefits from a strong diagonal created by the stole and tassel. A master's display needs a visible hood, while doctoral regalia usually requires more depth and more deliberate negative space because the tam, hood, robe panels, and medallion can quickly compete with one another.
Bachelor's template
Use a 16x20-inch box for a single cap, tassel, stole, and diploma when the actual garments fit without compression. Place the diploma in the lower-right or lower-center area on a raised mat ledge. Position the cap as the focal anchor in the upper-left or upper-center area, then let the stole create a controlled vertical or diagonal line between the two.
The tassel can hang beside the cap or descend from its lower edge, but don't let it cover the diploma text. Honor cords belong in an accent slot along the lower or side margin, arranged in loose waves rather than compressed coils. Leave enough space to identify the stole's lettering and any custom detail.
A bachelor's layout becomes crowded when families add every program, ticket, photograph, and ribbon. Choose one paper item, if any, and use a small label or date drop only when it adds useful context.
Master's template
An 18x24-inch box provides more room for a cap, stole, hood, diploma, and program. Place the hood across the upper third, folded over a stable dowel or supported by a concealed structure. The hood should be visible as a degree-level anchor, not buried behind the stole.
Set the diploma slightly forward in the lower center, with the program tucked behind it if the paper is stable and the text remains readable. The cap can occupy an upper corner, while the stole runs along one side to create balance. Keep the center open enough that the hood and diploma don't merge into a single dark mass.
Match tassels, stoles, and hoods through the school-color and degree accessories already selected for the ceremony. Graduation Cap and Gown offers individual regalia pieces and accessories, including tassels, stoles, hoods, diploma covers, and frames, so the display can coordinate with the items used at commencement rather than relying on unrelated replacements.
Doctoral template
Doctoral regalia needs a larger field. Choose 20x24 or 24x30 inches when the plan includes a tam, two tassels, robe panels, hood, medallion, and diploma. A doctoral box should feel intentionally spacious. Negative space is not wasted area. It prevents the hood and robe fabric from pressing into the cap or glazing.
Place the tam as the focal anchor in the upper center. Set the hood across the middle or upper third, supported so its trim remains visible. Arrange robe panels along the sides or lower corners, then place the medallion in a recessed holder where it can function as a visual counterweight.
Use the diploma in the lower center or lower-right, depending on the weight of the composition. Two tassels can balance the upper area, but they shouldn't create mirror-image tension if their colors or charms differ. Let one serve as the stronger accent and keep the second slightly quieter.
| Degree Level | Box Size | Keepsakes Included | Focal Anchor | Accessory Notes |
|---|---|---|---|---|
| Bachelor's | 16x20 | Cap, tassel, stole, diploma | Cap and stole | Add cords or a charm in a restrained accent slot |
| Master's | 18x24 | Cap, stole, hood, diploma, program | Hood | Coordinate hood, stole, and tassel colors |
| Doctoral | 20x24 or 24x30 | Tam, two tassels, robe panels, hood, medallion, diploma | Tam and hood | Use deeper supports and generous negative space |
A layout template is only a starting point. The fabric's actual fold lines, the diploma's format, and the shape of the school insignia should decide the final arrangement.
Hanging, Gifting, and Caring for Your Display
A finished shadow box can fail after framing if the wall hardware doesn't match its weight or the location exposes it to direct sun and unstable air. The hanging plan belongs on the checklist before the backing is closed, particularly for a deep box containing a cap, glass, mat board, and metal accessories.
For lighter frames, a properly installed stud-and-hook system or a suitable sawtooth hanger may be adequate. Heavier shadow boxes need two-point support, and oversized doctoral displays are better served by a French cleat that distributes load across the wall. One framing guide notes that shadow boxes often weigh 5–20 pounds or more, recommends a two-point D-ring system, and advises wall anchors or studs rated for at least 50 pounds to reduce drop risk and misalignment. This guide to mounting dimensional items safely explains why hardware should be selected after the frame is assembled, not guessed from the empty box.
Install with the finished weight in mind
Check the wall structure, the fasteners, and the spacing between the hanging points. A single central hanger can allow a deep frame to tilt, while a poorly placed anchor can loosen as the frame shifts. For oversized cases, follow reliable pro picture hanging tips that address alignment, support, and the relationship between hardware and wall construction.
Keep the display away from direct sunlight, heating vents, air-conditioning outlets, and areas with frequent humidity changes. A hallway with stable conditions is usually safer than a bright window wall, even if the window provides the more dramatic backdrop.
Prepare a shadow box as a gift
Before shipping or handing over the frame, check every mount by gently moving the sealed box. Nothing should slide, rattle, or press against the glazing. Wrap the display so the frame corners and front surface are protected, and include a care card explaining where to hang it, how to dust it, and which materials not to use during cleaning.
A graduation gift can be presented at the ceremony, after the family photographs, or later as an anniversary of the achievement. The timing matters less than giving the recipient a display that is already secure, legible, and ready to hang. If shipping a sealed shadow box, photograph the finished interior before packing it so the recipient has a record of the original arrangement.
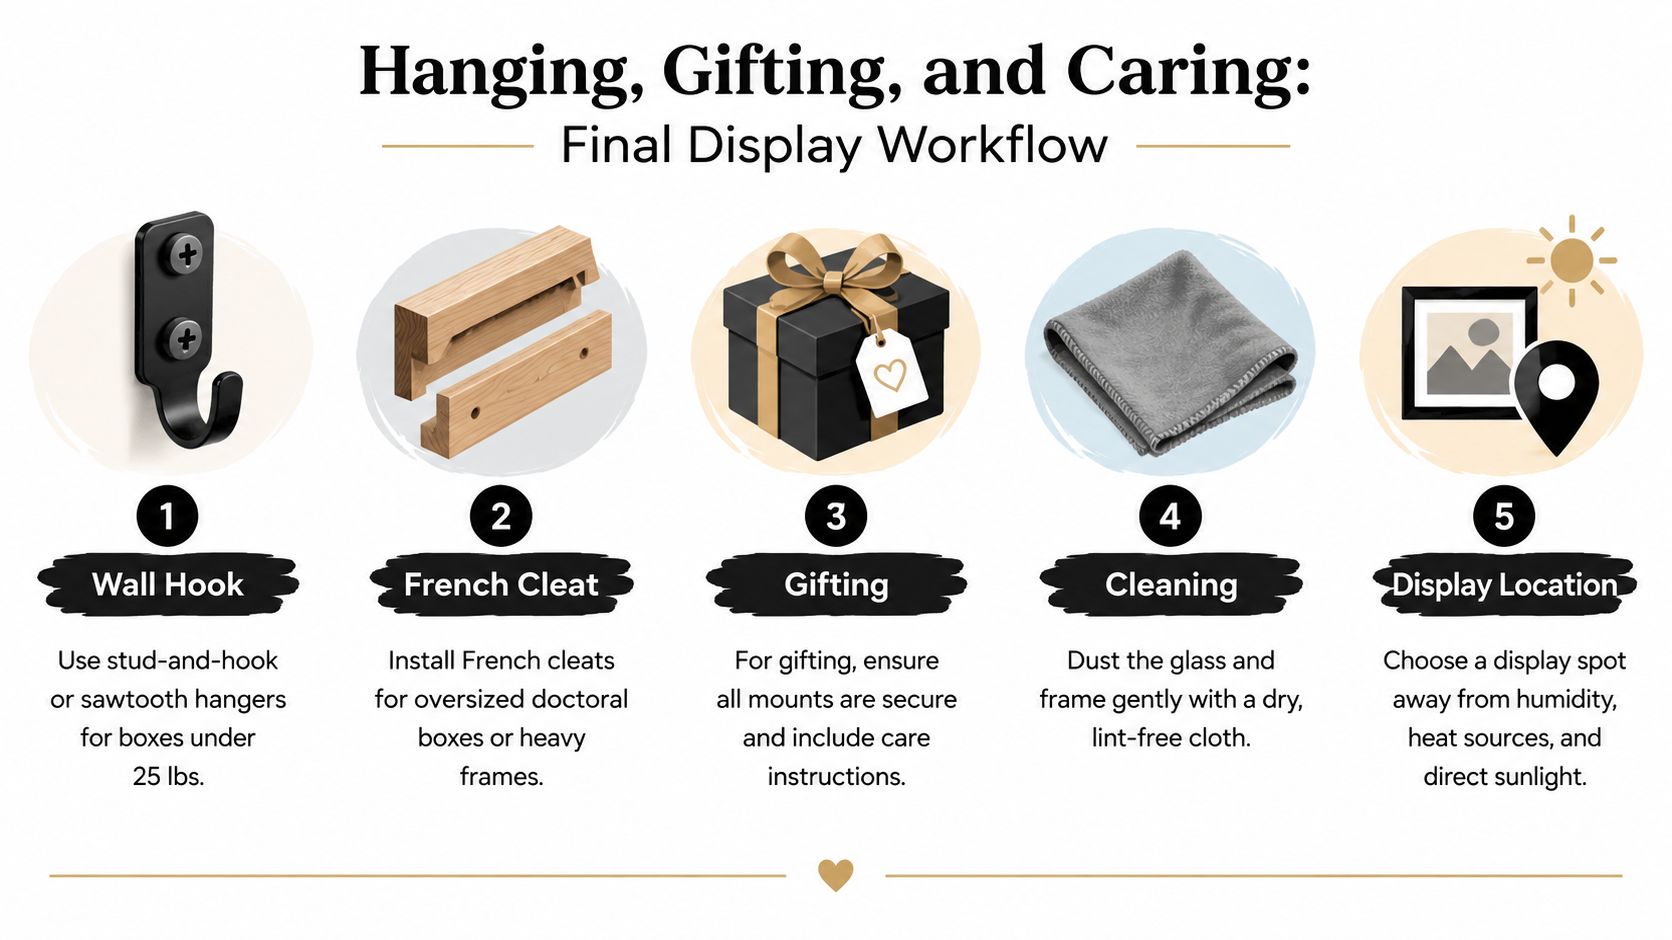
Follow a simple care routine
Dust the frame and glazing with a dry, lint-free microfiber cloth. For glass cleaning, apply the cleaner to the cloth rather than spraying toward the frame, because solvent or moisture can travel through joints and reach paper or textiles. Acrylic requires a cleaner approved for acrylic surfaces so the front doesn't develop scratches or clouding.
Keep room humidity between 45 and 55 percent where practical. Inspect the display every season for shifted mounts, loose threads, condensation, surface dust, or changes in fabric color. Plan a more complete inspection after five years to look for adhesive fatigue and to confirm that the frame remains sealed and level.
Final-care principle: Preserve the display by inspecting it occasionally, not by opening it repeatedly. Every opening introduces handling, dust, and the possibility of disturbing a carefully balanced mount.
A graduation shadow box display should feel finished without becoming untouchable. The cap, stole, diploma, cords, and medals remain visible, but each has enough support and separation to age on its own terms. With suitable hardware, controlled placement, and periodic inspection, the frame becomes a durable family heirloom rather than temporary décor.
Graduation Cap and Gown offers caps, gowns, tassels, hoods, tams, stoles, cords, medals, diploma covers, frames, and graduation accessories that can support a coordinated ceremony and keepsake project. Visit Graduation Cap and Gown to choose the regalia and accessories you want to preserve, then plan your shadow box around the pieces that carry the most meaning.